This guide is a complete Systeme.io Tutorial for Beginners. Here, you will learn step-by-step all about the Systeme.io online marketing platform and how to get started using all of its main features.
So if you want to learn all about this affordable all-in-one sales funnel builder, online course host, blog and website builder, and email campaign manager, then you’ll enjoy the helpful information in this guide.
Let’s get right to it with what we’ll cover in this beginner’s guide:

Table of Contents
Introduction to Systeme.io
In this Systeme.io tutorial for beginners, we provide a step-by-step guide to using all the main features contained in this all-in-one online marketing platform.
This guide will benefit anyone starting their new online business but don’t know where to start.
We get it, the process of launching a business online can be overwhelming and knowing where and how to get going is just the start.
There are many things to think about when starting your business – building a website, creating products, managing customers, marketing and more.
And that’s where a platform like Systeme.io comes in.
It’s an all-in-one tool designed to make running an online business easier, especially for beginners.
No need to learn and integrate 11 different pieces of software to get everything you want done.
Another fantastic aspect is the price – Systeme.io costs a fraction of the price of comparative platforms.
Now, let’s explore what Systeme.io is and how it can help you start and grow your online business.

What is Systeme.io?
Systeme.io is an all-in-on marketing platform designed to equip entrepreneurs with the tools they need to launch and grow their online businesses.
It offers a suite of features that include:
Sales Funnel Builder: Drag-and-drop functionality allows you to create high-converting sales funnels to capture leads and convert them into paying customers.
Email Marketing: Manage your email list, send targeted campaigns, and automate email sequences to nurture leads and boost engagement.
Landing Page Creation: Design beautiful and effective landing pages to capture leads and promote your offers.
Online Course Creation: Host and sell online courses to share your knowledge and expertise with the world.
Affiliate Marketing: Build a network of affiliates to promote your products and services and expand your reach.
Blog Management: Create a blog to attract visitors, build thought leadership, and drive traffic to your sales funnels.
Ecommerce: Sell digital and physical products directly through your Systeme.io platform.
Membership Sites: Create exclusive membership areas where members can access premium content or services.
For small business owners and new entrepreneurs in particular, it’s an excellent all-around tool for getting your business online, no matter what service or product you’re selling.
Most online sales platforms offer the basics. Take Shopify, for example.
Shopify is a very popular sales platform that allows you to quickly and easily get an online store up and running.
But if you want any added marketing functionality – such as email marketing, sales funnels, webinars – you need to subscribe to third-party apps at additional cost.

Those costs add up, depending on what you want to add.
But Systeme.io is different.
Instead of using many different tools for different tasks, Systeme.io puts everything you need in one place.
This saves small business owners like you time and money, and makes running your business simpler.
Why Choose Systeme.io Over the Competition?
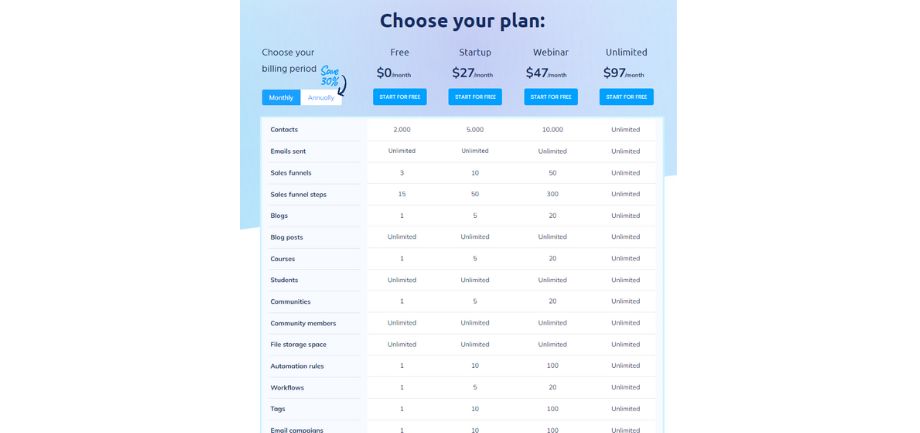
We’ll be taking a deeper dive into all the features of this platform in this Systeme.io tutorial for beginners, but here’s what you’ll definitely want to keep in mind – Systeme.io has a free plan (Not a free trial, a FREE PLAN).
That’s a big deal for any subscription service.
Here’s what you get with the free plan:
Sales Funnel Builder: Three funnels. Easily make high-converting sales funnels to capture leads and convert them into paying customers. The drag-and-drop interface makes building these funnels a breeze.
Email Marketing: Build an email list of up to 2,000 subscribers and nurture them with targeted email campaigns. Design engaging newsletters and craft automated email sequences to keep your audience engaged. You can also create one email marketing campaign.
Blog Creation: You can create one blog for free in order to create SEO rich content or establish your authority in your particular industry or market with an unlimited number of posts.
Create and Sell a Course: You can create and host one online course. Post videos, articles, downloadable material, you name it. And there’s no limit on the number of students you can have.
Build a Community: You can create one community. Manage your students or clients and provide them with ongoing value. You can also sell membership to a community as a subscription, either on their own as part of a larger package.
So why is this free plan such a good deal?
For many new entrepreneurs and small business owners like yourself, in the first days and weeks of your business, you need to get your venture off the ground, control your startup costs, and test your business ideas.
Systeme.io is the perfect way to do all these things. You get to validate your business idea, build an email list, and start generating sales – all before you invest a dime on a marketing platform.
Systeme.io’s free plan is a launchpad for aspiring entrepreneurs like you, allowing you to test, learn, and grow your online business without breaking the bank.
Once you’ve learned how to use the platform and see how it can make you money, you can upgrade and get even more features.
How to Get Started With Systeme.io
Signing up for Systeme.io is a breeze. Simply start by heading over to their website and create your free account.
Here’s a quick breakdown of the initial setup process:
Create Your Account: Sign up for a free Systeme.io account using your email address.
Complete Your Profile: Provide basic information about yourself and your business.
Connect Your Domain (Optional): Connect your custom domain name to your Systeme.io account for a more professional brand image. (You can skip this step for now if you don’t have a domain yet and just use a Systeme.io subdomain.)
Explore the Platform: Take some time to familiarize yourself with the interface and discover the various features offered by Systeme.io.
Once you’re in, you’ll be greeted by a user-friendly dashboard that provides a central hub for managing all aspects of your online business.
Key Features of Systeme.io
Website, Landing Page and Blog Builder
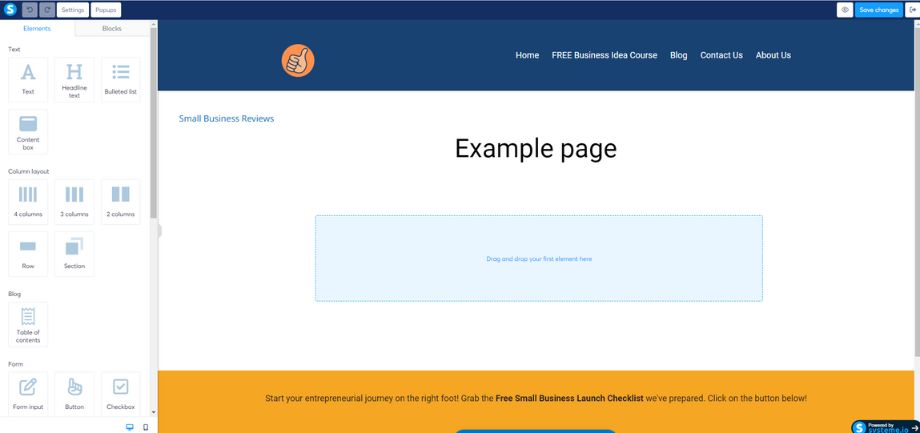
With Systeme.io, you can create a website without knowing how to code.
It offers landing page and blog templates and a drag-and-drop editor, making it easy to design your entire site.
You can customize colors, add your logo, and create pages for your products or services.
Sales Funnels
A sales funnel is like a path that guides potential customers towards making a purchase.
Systeme.io helps you create these funnels easily.
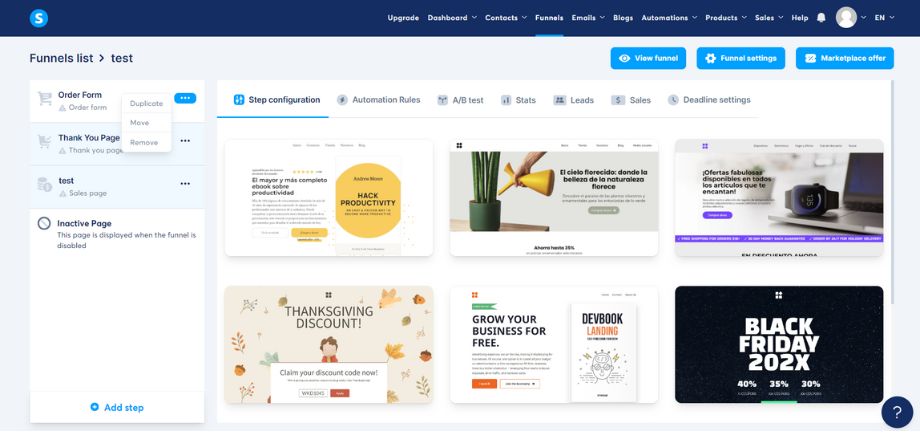
You can set up landing pages, thank you pages, and order forms all connected in a logical sequence.
Email Marketing
Staying in touch with your customers is important which is why Systeme.io includes email marketing tools.
You can create email lists, send newsletters, and set up automated email sequences.
This helps you build relationships with your audience and keep them informed about your products or services.
Online Courses and Membership Sites
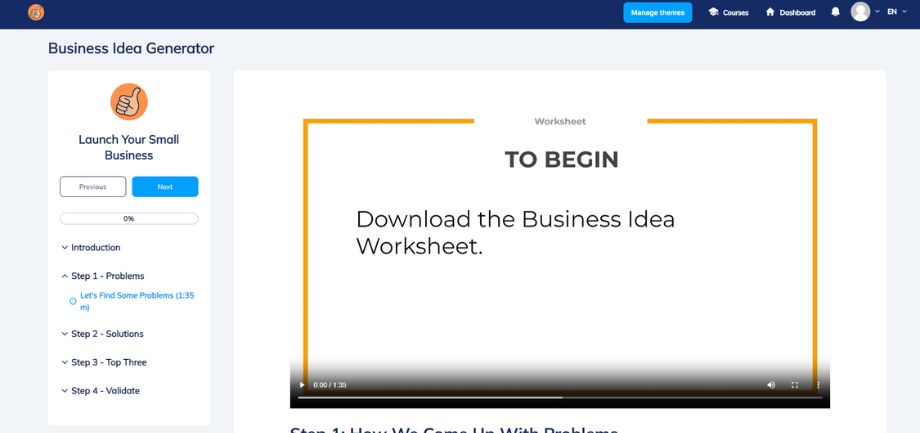
If you want to sell courses or create a membership site, Systeme.io has features for that too.
You can upload video lessons, create quizzes, and manage student progress.
It also handles payments and access control for your courses or membership areas.
Affiliate Program Management
An affiliate program lets other people promote your products and earn a commission.
Systeme.io makes it easy to set up and manage an affiliate program.
You can track sales, manage commissions, and provide marketing materials to your affiliates.
Payment Processing
Taking payments online is crucial for any online business. If your starting a new online small business, the goal is to make a profit.
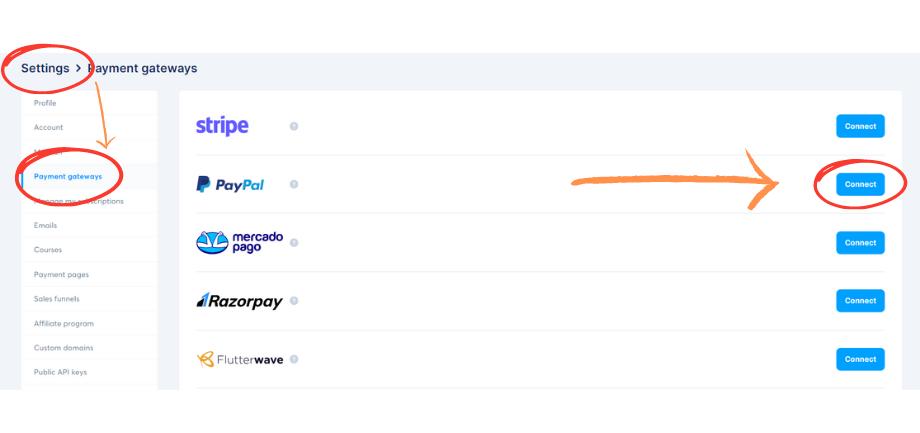
Systeme.io integrates with two of the most popular payment gateways, PayPal and Stripe. It also integrates with Xendit, Razorpay, Flutterwave, and Paystack.
Once connected to your Systeme.io account, you will be able to accept credit cards and other payment methods easily.

How to Build a Blog in Systeme.io
This Systeme.io tutorial for beginners will now turn to how to build a blog using the platform.
To create a Blog, first, go to the “Blog” tab in the Main Dashboard.
From there, click “+ Create”.
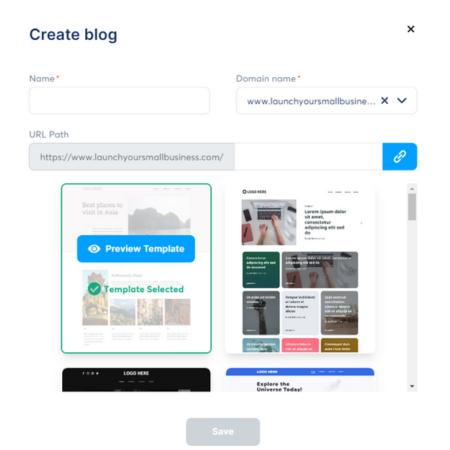
You will get the pop up shown below – Give your blog a name, chose your custom domain name if you have one, then give it a URL path.
Finally, chose a template. Click “Save” when you’re done.
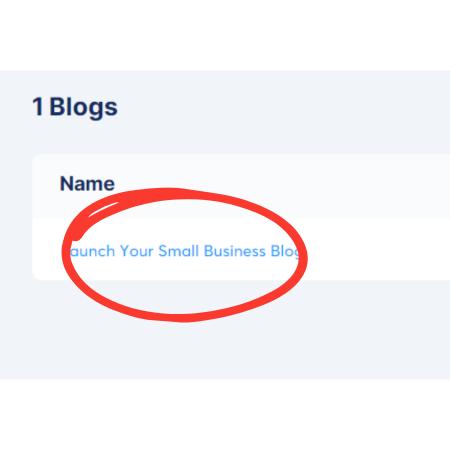
You’ll now see a list of your blogs. To edit one, click on it.
Once clicked, you’ll be taken to the Blog Posts page.
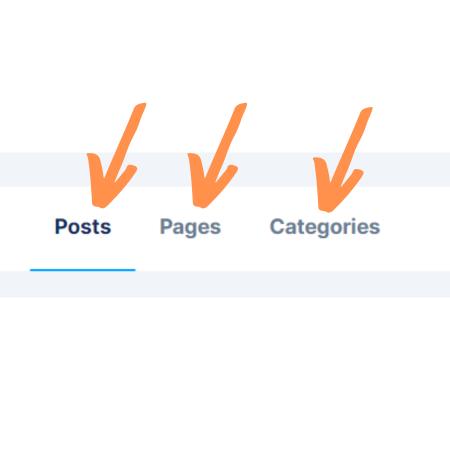
You’ll have 3 options here – Posts, Pages and Categories.
Posts are the individual Blog Posts.
Pages are for more general pages like a Privacy Policy, Terms of Service, About Us, etc.
Four pages are automatically created when you create a blog.
Categories allows you to create categories to label your blog posts.
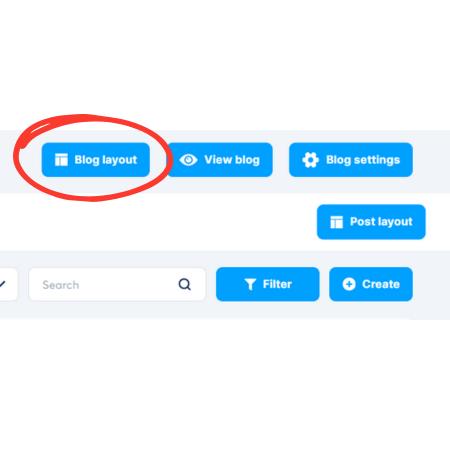
On the right side of the screen, you’ll have a number of options.
The first we’ll look at is “Blog Layout”.
If you chose, this option, you’ll be taken to a drag and drop editor that will allow you to design the basic framework for all your blog posts.
Any page elements chosen here will show up on all your blog page layouts.
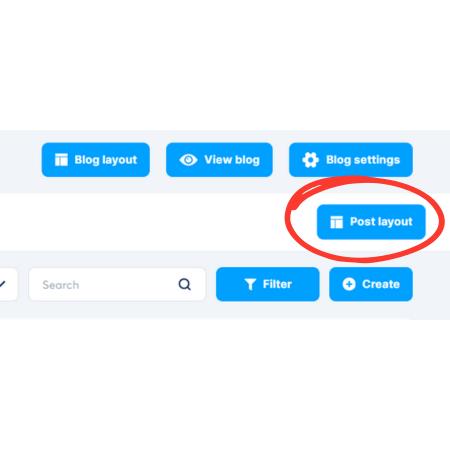
The “Post layout” button is similar to the “Blog layout” button, except this will allow you to create the layout template for all your individual blog posts.
Any page element chose here will show up across all your blog posts.
Finally, you have the “+ Create” button for creating the individual posts
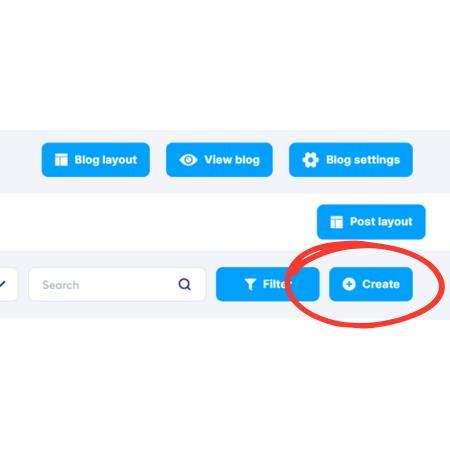
Click it and then you’ll see the pop-up below.
Give your blog post a title, give your blog post a short description and add your url post.
You also have the options of adding an image for the Posts page and selecting which category you want the post to show up under.
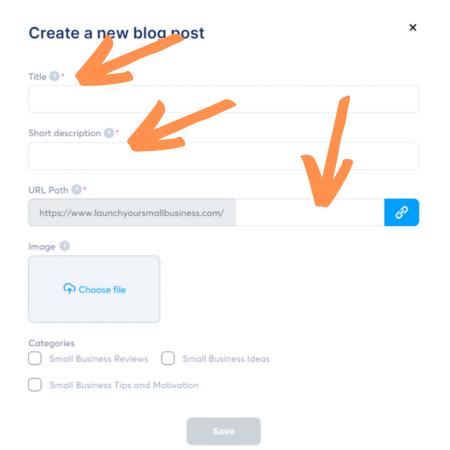
Once you click “Save”, you’ll be taken to the drag and drop editor.
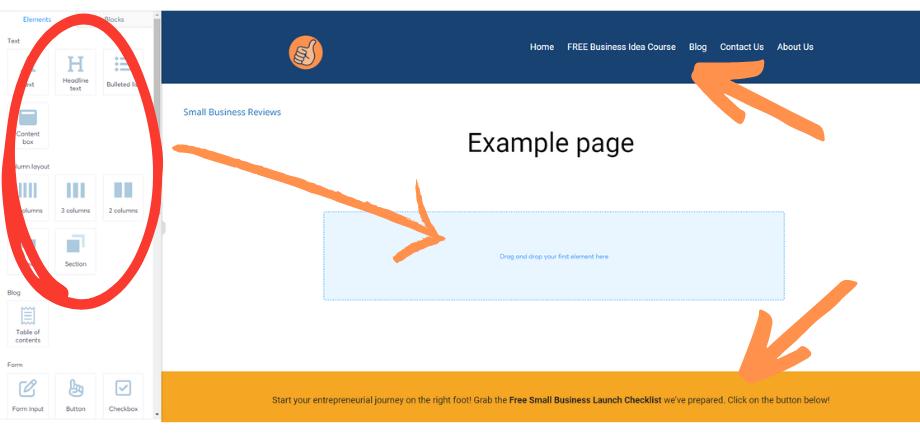
In the image below, you can see the header and footer are already there – they were made in the “Post layout” page so show up on all the posts.
You then have two tabs on the left hand side titled “Elements” and “Blocks”.
Use these to design your post. This post, as an example, was designed in this exact way.
Make sure to save as you go along.
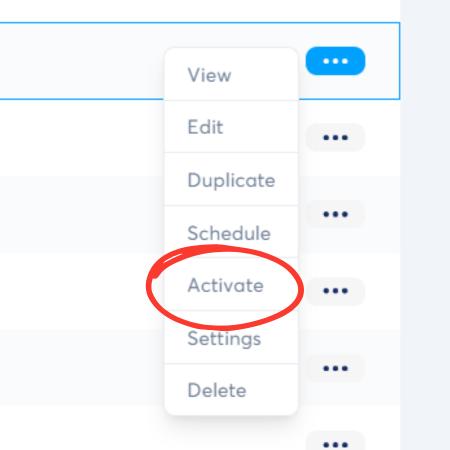
Once you’re done, go back to the blog post list page.
Go to the three dots beside the post you just finished and click “Activate” to publish it on the site.
If you don’t click “Activate”, the post will remain unpublished in draft mode.
How to Build Your First Sales Funnel
The heart of Systeme.io lies in its powerful sales funnel builder, as you’ll learn in this next section of our Systeme.io tutorial for beginners.
Sales funnels are a series of interconnected pages designed to guide visitors towards a specific goal, such as subscribing to your email list, purchasing a product, or registering for a course.
By leveraging Systeme.io’s sales funnels, you can create a streamlined path that converts website visitors into paying customers.
Here’s a quick guide to creating your first sales funnel in Systeme.io:
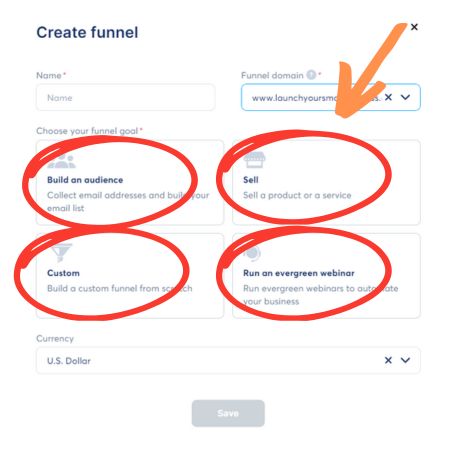
1. Choose Your Funnel Type: Decide what action you want visitors to take at the end of your funnel (e.g., email signup, product purchase, etc.) and select the appropriate funnel template from Systeme.io’s library.
To create a sales funnel, you’ll want to select the “Sell” option.
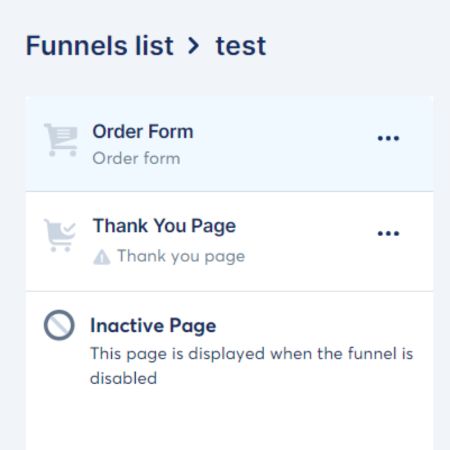
2. Customize Your Funnel: Each stage of your funnel consists of a distinct page (e.g., landing page, order page, thank you page, etc.).
The picture to the right shows a simple two-step funnel consisting of an Order Form and a Thank You Page.
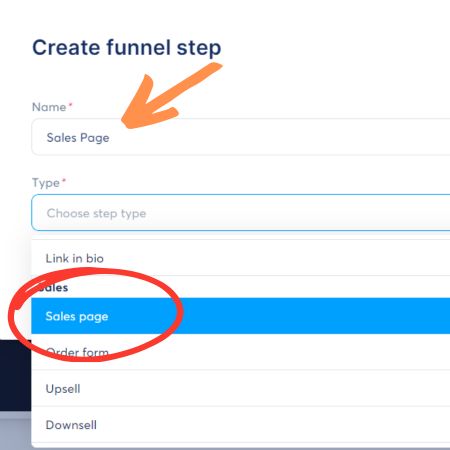
3. Add Funnel Steps: You can customize your sales funnel by adding steps, for example a landing page or “sales page” which is used to first provide information to a potential customer before sending them to an order page or an “opt-in” sign-up page.
You can also add a “squeeze page” into your funnel the same way.
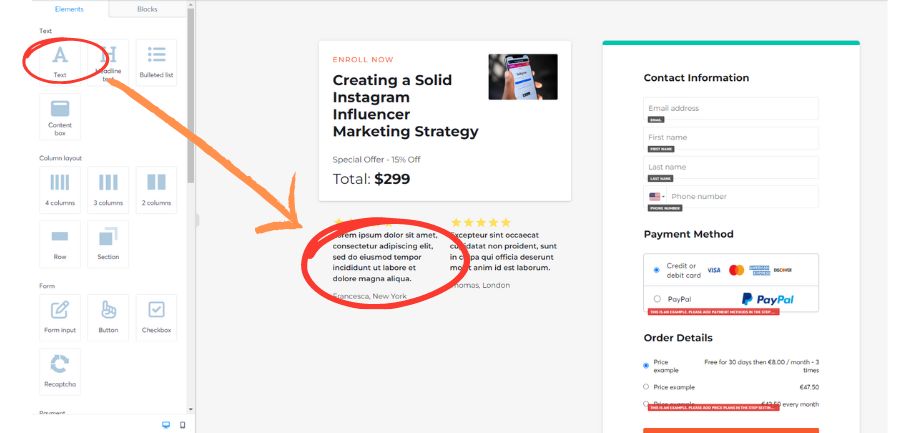
4. Drag and Drop Layout: Once you have all the pages to your sales funnel in the list, utilize the drag-and-drop editor to easily personalize your pages with text, images, videos, forms, and more.
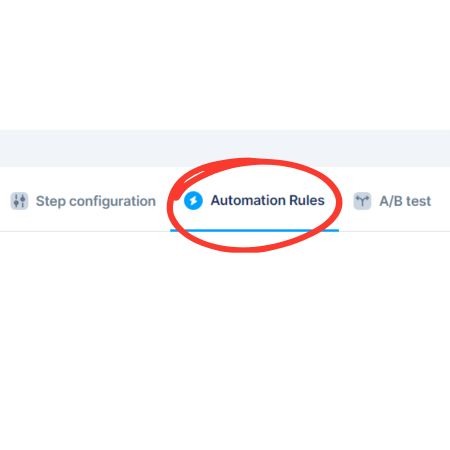
5. Set Up Automations: Systeme.io allows you to automate various actions within your funnel, such as sending emails to new subscribers, subscribing them to a course or adding them to specific lists.
How to Build Landing Pages With Systeme.io
As you’ll see in this next section of our Systeme.io tutorial for beginners, high-converting landing pages are essential for generating leads, growing your email list and converting visitors into customers.
Systeme.io provides a user-friendly drag-and-drop builder to create stunning landing pages without needing any coding skills.
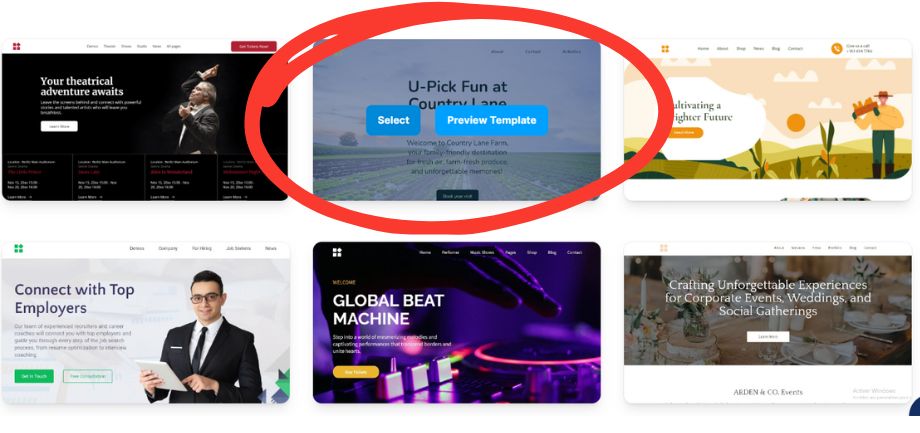
1. Choose a Template
Systeme.io offers a variety of pre-designed templates to get you started.
Select a template that aligns with your brand and the goal of your landing page.
You also have the option of previewing the page which will give you a better look at all the elements on that specific template
2. Customize Your Design
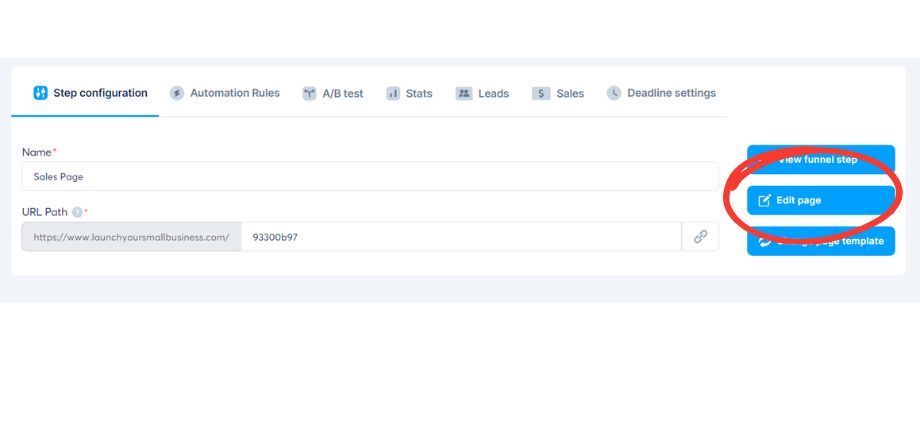
Customize the template by adding your own images, text, and branding elements.
Chose “Edit Page” after clicking on the funnel step you want to change.
3. Page Editor
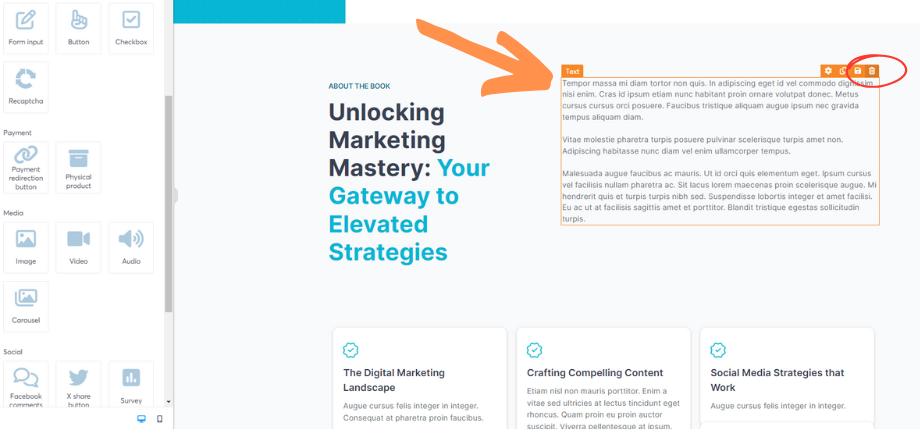
The drag-and-drop interface makes it easy to experiment with different layouts and designs.
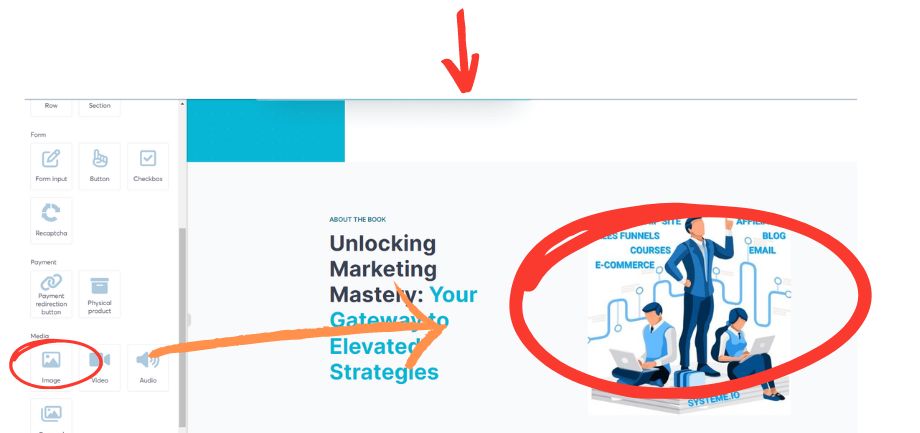
In this example, we easily change a block of text to an image.
You first select the text block and delete it.
Next, you select the “Image” option and drag it to where you just deleted the text.
Finally, with the image box highlighted, chose which image you want to import.
It’s that simple.
4. Optimize for Conversions
Your sales funnel needs a clear and compelling calls to action (CTA).
Use persuasive copy and visually appealing elements to encourage visitors to take the desired action, whether it’s signing up to your email list or making a purchase.
Look at your sales funnel as a journey you are taking your potential customer on. They need clear instructions on what the next step is, otherwise they may simply click off the page.
5. Landing Page A/B Testing
This is a great feature to have when building a sales funnel and it’s included in Systeme.io.
Basically, Systeme.io allows you to easily create and test multiple versions of your landing page to see which one works best with your potential customers.
Experiment with different landing page variations to identify what works best for your audience.
How to Manage Your Email List
A strong email list is the backbone of any successful online business.
And by effectively managing your contacts, you can build stronger relationships with your audience and deliver highly relevant content that builds trust, authority and opportunity to sell your digital or physical products.
Systeme.io makes it easy to manage your contacts and nurture them into loyal customers.
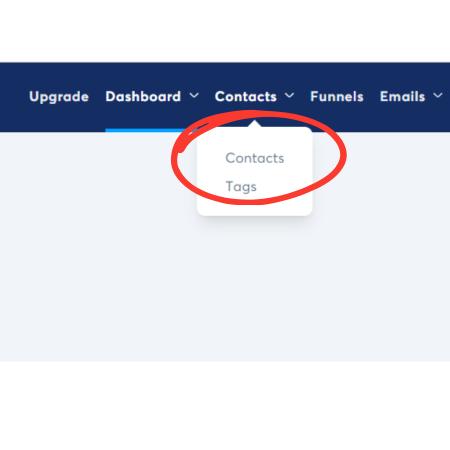
From the main dashboard, select “Contacts” then “Contacts” again from the dropdown menu.
Build Your Email List
To manage an email list, you first need to build one.
Luckily, this part of the Systeme.io tutorial for beginners will show you how to build your email list in Systeme.io.
Landing Pages & Opt-in Forms: Create eye-catching landing pages with enticing opt-in forms that encourage visitors to subscribe to your email list.
In exchange, you provide valueable content that caters to your audiences’ interests and builds your authority and credibility.
Offer valuable freebies like ebooks, cheat sheets, or discounts in exchange for their email address.
Website Signup Forms: Embed signup forms on your website to capture leads directly.
Systeme.io allows you to easily integrate these forms with your website builder.
Lead Magnets: Develop compelling lead magnets, such as downloadable resources, webinars, or free consultations, to incentivize visitors to subscribe.
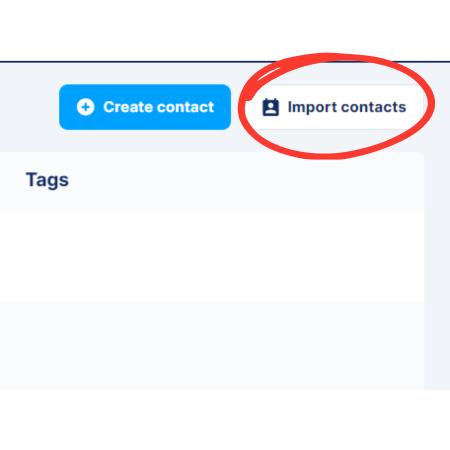
Import Your Existing Contacts: The platform provides an easy way to import your existing customer email list, with detailed instructions on how to do it.
The platform cautions that if you are importing a new list, that you have the recipients permission to be sending them marketing emails.
Too many complaints from recipients about unwanted or unsolicited emails will get your account suspended.
Create and Manage Contact Lists
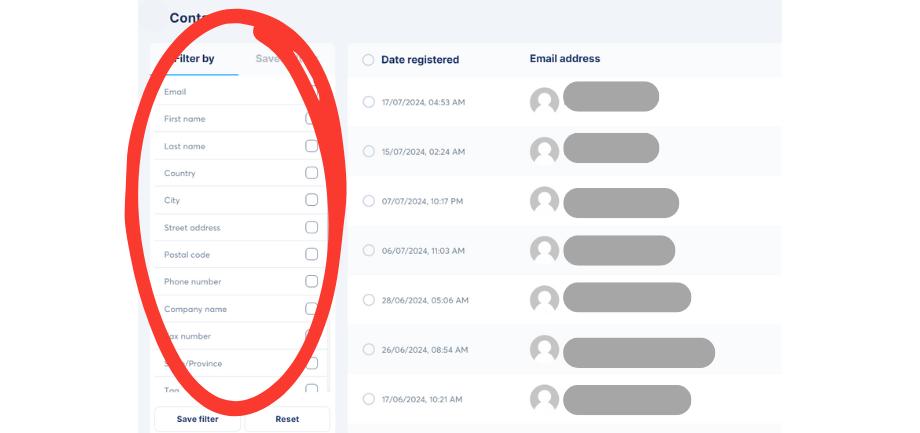
Organize your contacts into different lists based on specific criteria, such as interests, demographics, or purchase history.
This segmentation allows you to send targeted emails and tailor your marketing efforts.
This is the information you collect when you’re building your sales funnels and you create a “Form Input”.
Add Custom Fields
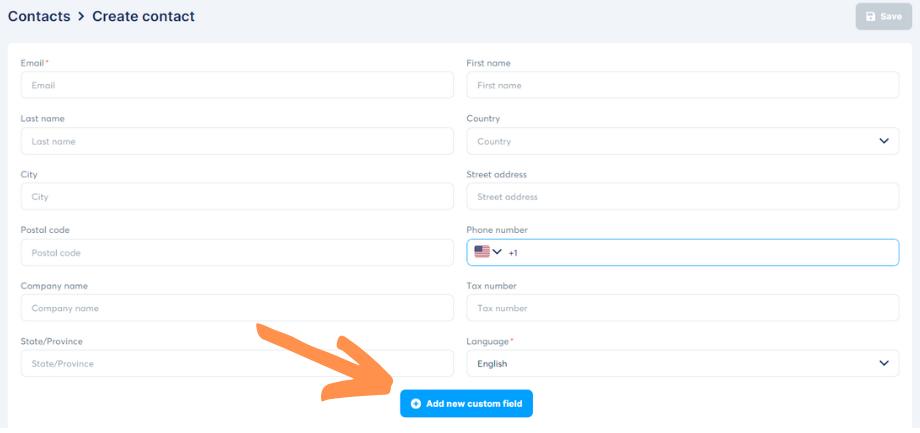
Systeme.io provides 16 of the most common fields (email and name being the two most important), but if you want to collect a specific piece of information that’s not on the list, you can create a Custom Field.
This data can be used for personalization, segmentation, and better understanding your audience.
Tagging Contacts
Use tags to categorize contacts based on specific behaviors or actions.
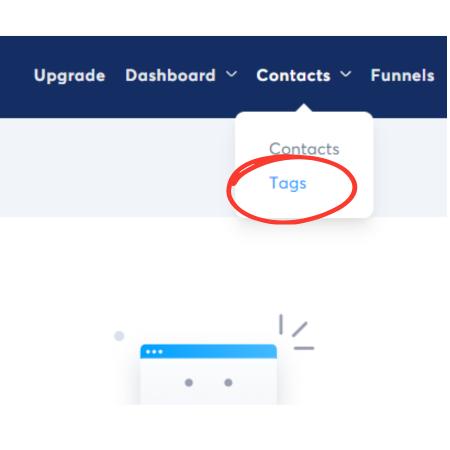
Tags can be found from the Main Dashboard > Contacts > Tags.
How to Create an Email Campaign
In this section of our Systeme.io tutorial for beginners, we’ll go over a step-by-step guide to creating your first email marketing campaign using Systeme.io’s user-friendly interface.
Systeme.io, however, does not currently host your email account, so you will need to link your email hosting account to make use of these marketing features.
While you can open a Systeme.io account with a free account like Gmail or Yahoo, you cannot create an email campaign with one.
Step 1: Get a domain name and email: To properly use Systeme.io’s email campaign functions, you’ll need a domain and an email host.
We recommend using Hostinger– just go to the site and purchase a domain name and email hosting.
Hostinger has some very affordable options and integrates well with Systeme.io.
Step 2: Authenticate Your Domain and Email: Once you have your domain name and email hosting all set-up, follow the instructions provided by Systeme.io here to authenticate your email and domain so you can use them within Systeme.io.
Got your domain and email taken care of? Good, now you’re ready to create your first email campaign within Systeme.io.
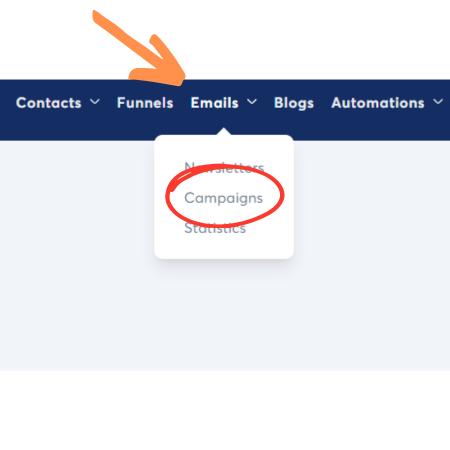
Step 3: Create Your Campaign: First, from the Main Dashboard, go to “Emails”, then select “Campaigns”.
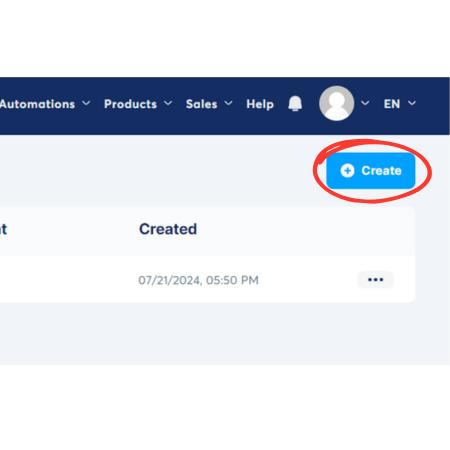
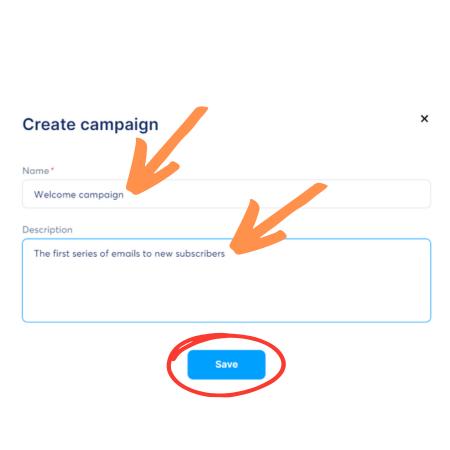
Next, click “+Create” and fill in the popup box with your Campaign name and a brief description of it for future reference.
Click “Save”.
You will now have create your an email campaign, but it still needs content.
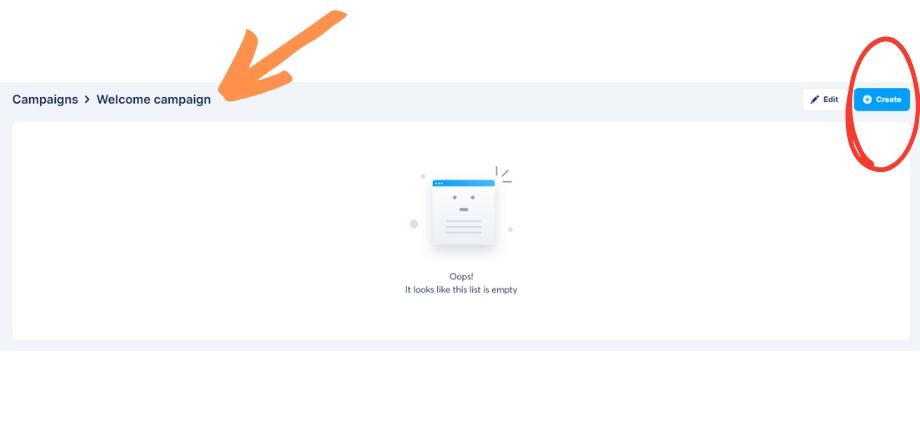
To do that, you want to click on the campaign name.
This will bring you to the Campaign – Campaign Name screen.
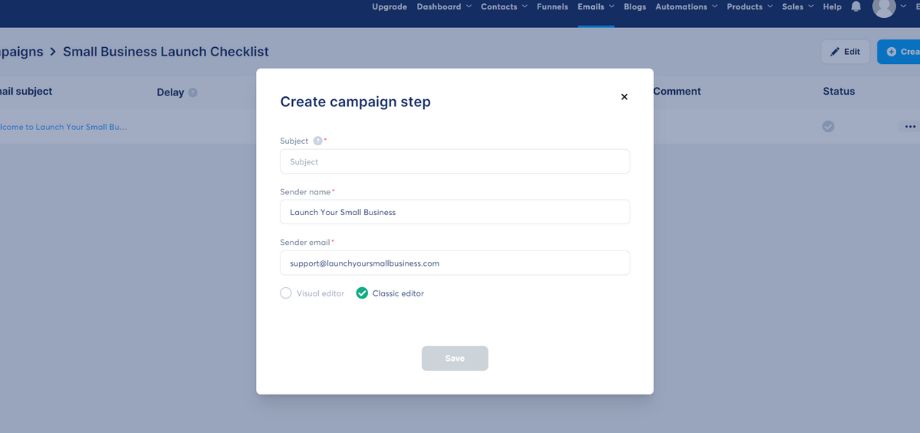
In the image below, we named our campaign “Welcome Campaign” since it will be the series of emails that get sent out when a new person signs up to our email list.
From this screen, click “+Create” to create the actual emails within the campaign.
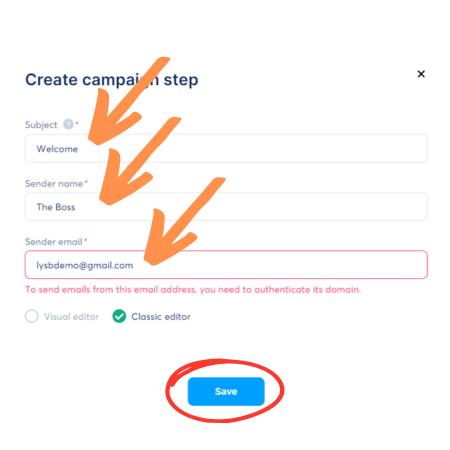
You will now see another pop-up. Fill in the blank fields.
The “subject” field is what will show on your email subject line once it is sent.
Give this some thought. Your subject line will likely determine if the receipient opens your email or not.
If Systeme.io doesn’t approve the email address you enter in the “sender email” field, it’s because you have not fully authenticated your domain and email yet.
Click “Save” once done.
You also have two options for editing your emails. “Classic editor” will let you design one from scratch.
Choosing “Visual editor” gives you Systeme.io’s email templates that you can change to suit your needs.
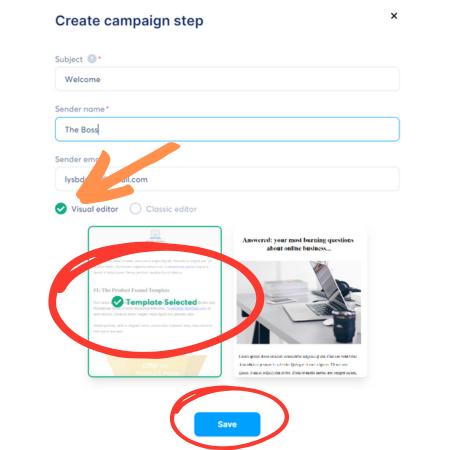
Step 4: Design Your Email
Choose an Email Template: Systeme.io offers a library of pre-designed email templates to get you started. Select a template that aligns with the tone and style of your brand.
Drag-and-Drop Editing: Systeme.io utilizes a user-friendly drag-and-drop editor.
Simply drag and drop various elements like text boxes, images, buttons, and social media icons to customize the template and create your email content.
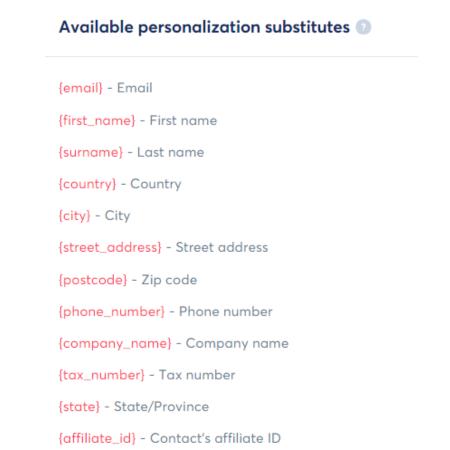
Personalize Your Message: Personalize your email by including your subscriber’s name in the greeting.
Under the ‘Available personalization substitutes’, you can include any personal detail in the email that you collected during the sign-up phase.
Craft Compelling Content: Write clear, concise, and engaging email copy that resonates with your target audience.
Offer valuable information, highlight relevant promotions, and include a strong call to action (CTA) that tells subscribers what you want them to do next.
Preview and Test: Before sending, preview your email on different devices (desktop, mobile) to ensure it displays correctly.
Use Systeme.io’s built-in spam checker to ensure your email lands in inboxes, not spam folders.
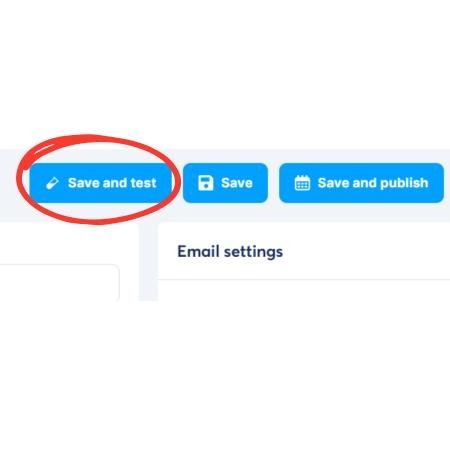
Step 5: Schedule and Send Your Campaign
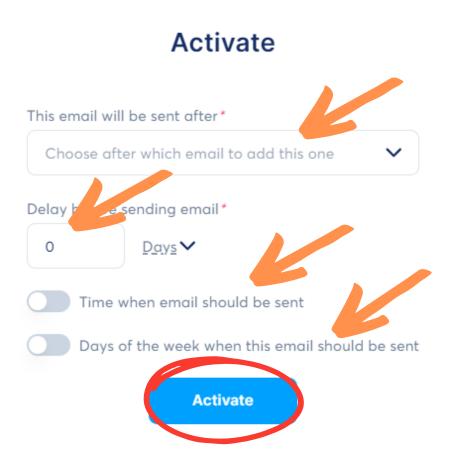
Select Recipients: Choose which subscribers will receive your email campaign. You can segment your list based on interests, demographics, or other criteria to personalize your message further.
Schedule Your Email: Schedule your email to go out at an optimal time when your subscribers are most likely to open and engage with your message.
Systeme.io allows you to schedule emails for immediate delivery or set them for a future date and time.
Send Your Campaign: Once you’re confident with your email and recipient list, hit the “Send” button to launch your first email marketing campaign!
Bonus Email Marketing Tips
Track Your Results: Monitor your email campaign’s performance using Systeme.io’s analytics tools.
Keep an eye on open rates, click-through rates, and unsubscribe rates to understand what resonates with your audience and make adjustments for future campaigns.
Maintain Consistency: Don’t bombard your subscribers! Develop an email marketing cadence that provides value consistently without overwhelming them.
Aim for a regular schedule, such as weekly or bi-weekly emails.
Subject Line Magic: Craft compelling subject lines that grab attention and encourage subscribers to open your emails.
How to Create and Sell Online Courses
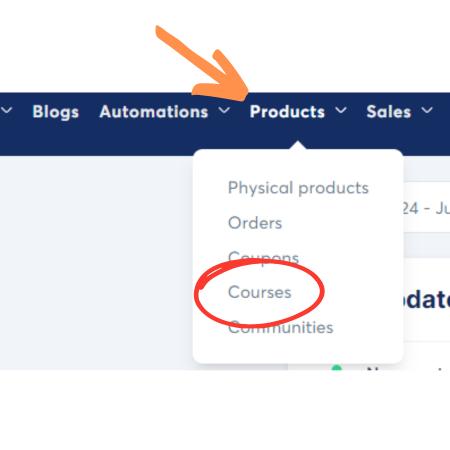
You can also use Systeme.io to create and sell online courses, which we’ll now cover in this section of our Systeme.io tutorial for beginners.
With its intuitive interface and comprehensive features, you can easily share your knowledge and expertise with the world.
Creating Your Course
Define Your Course: Clearly outline your course content, target audience, and learning objectives.
You’re also going to want to test your potential market with your course idea before going all-in on the idea.

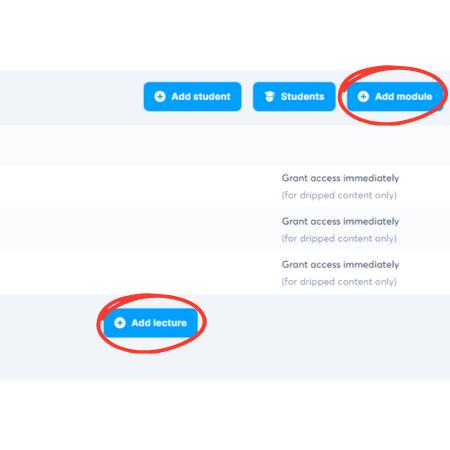
Structure Your Course: Break down your course into individual modules and lectures for easy navigation.
In Systeme.io, a module is a group of one or more lectures. Think of them as the chapters in your course.
The lectures are the individual course lesson videos or articles for the students to progress through.
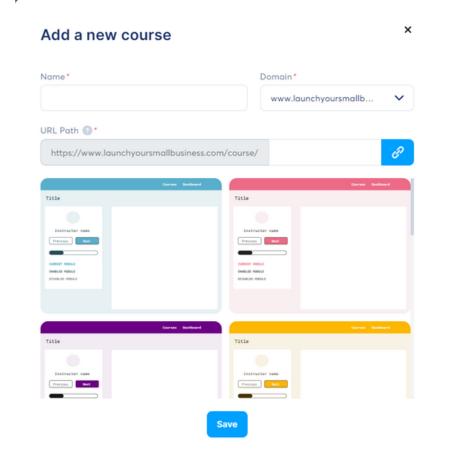
You can make all your course content immediately available or you can “drip” it, meaning you give access over time so your students complete each step before progressing to the next one.
Design Your Course Layout: Utilize Systeme.io’s course builder to design an attractive and user-friendly learning environment.
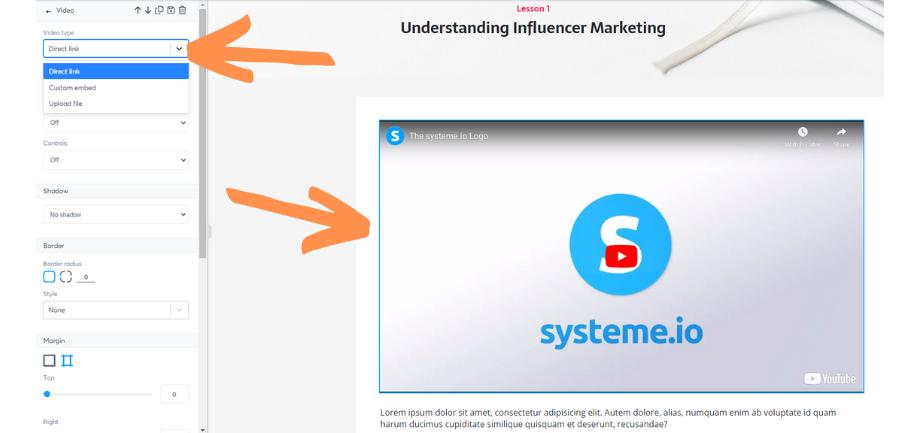
In the image below, you can see how easy it is to add a video lesson.
You have several options for how your video gets added. You can choose to link to an exiting video you have hosted on Youtube by choosing “Direct Link” from Video Type on the right sidebar.
Or, Systeme.io will host the video for you – just choose “Upload file” from the Video Tpye menu, upload your saved video and you’re done!
Adding Content to Your Course
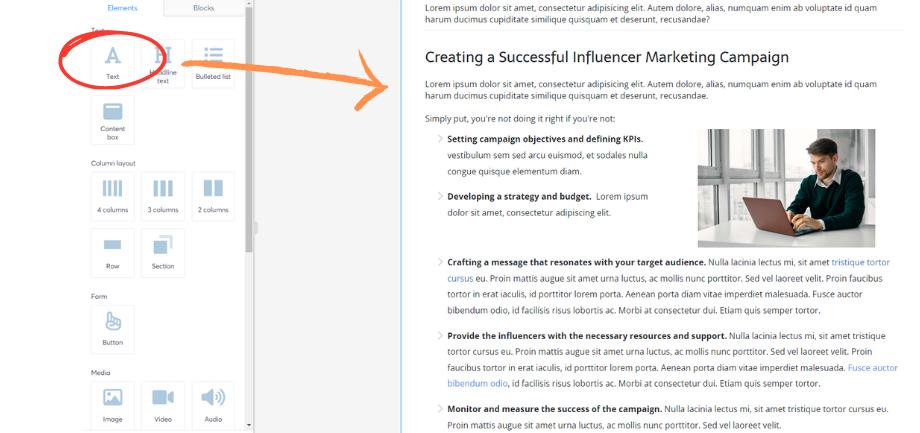
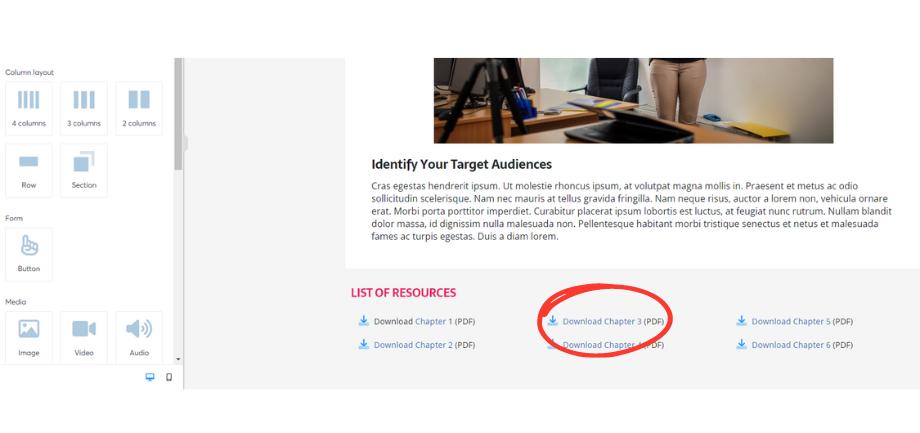
Most online courses a based on the video content like we showed you above, however, you can add quizzes, assignment, reading material and digital downloads to help you students get the most value from your content.
Setting Up Your Course Sales Page
Your sales page is where you’ll convince potential students to enroll in your course.
Create a compelling sales page that highlights the benefits of your course and includes clear calls to action.
We covered creating a sales page back when we discussed setting up a sales funnel.
Pricing and Payment Options
Systeme.io offers flexible pricing options, including one-time payments, subscription models, and payment plans.
Choose the pricing structure that best suits your course and target audience.
Promoting Your Course
Leverage Systeme.io’s marketing tools to promote your course, such as email marketing, sales funnels, and affiliate programs.
We’ll take a look at Systeme.io’s affiliate marketing in the next section.
Affiliate Marketing with Systeme.io
Since this Systeme.io tutorial for beginners is aimed at new users of Systeme.io, we’re not going to spend too much time discussing the affiliate marketing program you can design in the platform.
That said, we’ve included a brief overview of it since affiliate marketing can be a lucrative income stream when done right.
Systeme.io offers a robust platform to help you build and manage your very own affiliate program.
An effectively managed affiliate program can expand your reach, increase sales, and build a loyal community of affiliates who are making sales on your behalf.
Setting Up Your Affiliate Program
Define Your Affiliate Offer: Decide on the products or services you want to promote through affiliates.
Set Commission Rates: Determine the commission structure for your affiliates (e.g., percentage-based, fixed amount).
Create Affiliate Links: Generate unique affiliate links for each affiliate to track their performance.
Provide Affiliate Resources: Offer marketing materials, promotional content, and training to support your affiliates.
Recruiting and Managing Affiliates
Promote Your Affiliate Program: Attract potential affiliates through various channels, such as social media, email marketing, and affiliate networks.
Provide Affiliate Support: Offer assistance and resources to help your affiliates succeed.
Track Affiliate Performance: Monitor affiliate activities and commissions to optimize your program.
Leveraging Systeme.io for Affiliate Management
Systeme.io provides tools to help you manage your affiliate program efficiently:
Affiliate Dashboard: Track affiliate performance, commissions, and payouts.
Affiliate Links: Create and manage unique affiliate links for each affiliate.
Affiliate Marketing Automation: Automate tasks like generating affiliate reports and processing commissions.
Conclusion
We hope you enjoyed this Systeme.io Tutorial for Beginners.
If you made it this far in the article, you’ll have learned that by using the all-in-one marketing toolkit provided by Systeme.io, you can easily launch and expand your online business.
You can develop sales funnels, nurture leads with focused email campaigns, create a blog, and offer informative online courses by utilizing its many capabilities.
Always keep in mind that understanding your audience, producing value-added content, and continuously refining your campaigns are the keys to success with Systeme.io.
Finally, remember to try out various tactics, monitor your progress, and modify your plan of action as necessary.
By fully using Systeme.io’s capabilities, you will be that much further ahead in achieving your business goals.
Hopefully, this Systeme.io tutorial for beginners helped you out on that journey.
Click here to get your free account.
Frequently Asked Questions
What is Systeme.io all about?
Systeme.io is an all-in-one online marketing platform that helps small businesses create and launch sales funnels, email marketing campaigns, online courses, blogs, webpages, even affiliate programs.
Is Systeme.io really free?
Systeme.io has a free plan that allows you to create an entire website. In the current free plan, you get 3 funnels, 2,000 contacts, 1 community, 1 blog and 1 course.
Do I need hosting for Systeme.io?
Systeme.io hosts all your site’s content – blogs, sales funnels, email campaigns, course videos and downloads.
Is Systeme.io good for blogging?
As an all-in-one online marketing tool, Systeme.io offers a build-in blogging feature. With the free plan, you can get a blog up and started at no cost. You can build from scratch or use one of the many pre-designed templates.
How to make money on Systeme.io?
Systeme.io allows you to make money numerous ways. You can sell online courses, digital and physical products, promote affiliate products through a blog or email list, even sell subscriptions to an online community.
We hope you enjoyed that tutorial. If you’re still looking for affordable but powerful ecommerce marketing and sales platforms, check out our comparison of Shopify and Ecwid here!

| Affiliate Disclosure: Launchyoursmallbusiness.com uses affiliate links. If you click on a link and make a purchase, we may earn an affiliate commission, at no extra cost to you. |


